|
CROSSWAY GUIDE FOR THE NEW WHITE METAL KIT BUILDER
We have prepared this guide to assist the new white metal kit builder and give him the benefit of some of the tips that we have learnt through years of building these fine models. These are guide lines only as each of us have our own way of doing things that suit us, but the basics should remain the same and even the seasoned builder may learn something new.
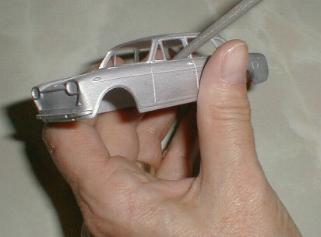
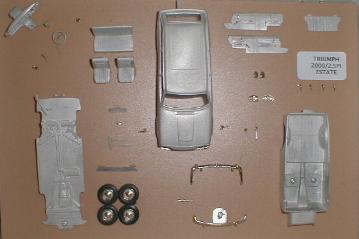
What do you get with your new kit, well this picture should give you a fair idea of what to expect. All bright parts are nickel plated and the windows are vac-form created and stored within the body for safe keeping.
This picture shows the ABBEY CLASSICS Triumph 2000/2.5PI Estate and is typical of all the Abbey Classics range.
You will require some tools however and some of these that will be of considerable assistance are listed here.
Most kits come with basic instructions and parts lists. Always read the instructions carefully and check all the parts off on the parts list, items can be missed out and when the kits are shown to prospective customers at a Show there is always the possibility of parts being lost. Contact with the manufacturers should sort any missing or broken items.
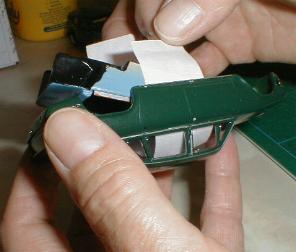
CLEANING WINDOW AREA WITH NEEDLE FILE
The preparation of the castings is the first job; the paint finish on the finished model depends upon a good job done here. Clean off any flash, feeds or mould lines from the castings using a small file or needle file. Start with the body, base and interior tub, when cleaned trial fit all the parts to ensure a good fit and nothing has to be fine tuned with the file for a better fit. Make sure that the window areas are de-flashed using the needle file, being careful not to remove more than required. Clean all the ancillary interior parts and test fit in the tub ready for painting. If there are any holes required to be drilled, now is the time to do it, test fit all parts in their holes and remember that a coat of paint will be added, as fine as it is, it can make a difference. Holes drilled after painting have a habit of chipping the area around them and will necessitate touching up afterwards. It is beneficial to rub over the body prior to painting with either fine wet and dry or a fine brass wire brush. I sometimes use an old suede brush for this job, as it doesn’t mark the body casting.
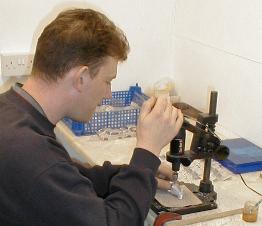
DRILLING A BODY WITH A PILLAR DRILL.
A HAND DRILL OR PIN VICE AS SHOWN IN THE TOOLS PICTURE IS ALSO IDEAL FOR THIS PURPOSE.
USING AN EMERY BOARD TO REMOVE SLIGHT HIGH SPOTS FROM THE BODY CASTING.
We should now be ready for painting, wherever you are painting will require to be well ventilated and warm, any dampness in the air may effect the paint and for your own safety USE A MASK. The body has to be primed first of all, a good route to take is an etch primer from Car Accessory shops, this will key to the casting. When fully dry lightly rub this down, you should now find any minor blemishes in the casting that will require filling, we use stopper for this and again rub down when dry. Re-coat with the primer if required, it is possible to just blow in any damaged areas, but if you have a good finish it is possible to go straight to the topcoat after rubbing down. If you intend to bright scrape the model it is a good idea to remove any primer from the areas that you intend to bright scrape whilst rubbing down. For the topcoat, in the colour of your choice, you can either use Humbrol enamel aerosol cans or again from the Car Accessory Shop use proper vehicle paint aerosols. These should be used in the garage, garden shed or outside to save having very irate other half’s, as these paints do not always smell the nicest of things in the kitchen. Some of us have air brush facilities, as these will give the best results, they can be purchased from Model Shops quite cheaply using small cans of propellant from the same source.
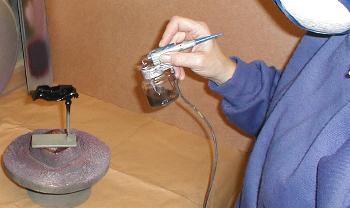
SPRAYING TOP COAT WITH AIR BRUSH ONTO A BODY MOUNTED ON A STAND. NOTE THE USE OF THE RATHER CRUDE BUT USEFUL TURNTABLE AND THE PAINTER IS WEARING A DISPOSABLE MASK.
To hold the body it is useful to have something that fits into the hole in the front or rear pillar. If it is a snug fit it will permit you to hold the item up as you spray and you can paint the inside areas as well as the outside. Always remember to give the first coat with the paint spray pointing upwards onto the body. This ensures that a full covering is given to those areas below rain gutters and side stripes etc. When dry another rub down with very fine wet and dry prior to a second and third coat will achieve good results. Carefully polish the body with T Cut or similar to remove any blemishes in the paint finish, being careful not to polish through the paint, a final polish with household furniture polish will give a good shine without leaving the white sediment that car polish will leave. Alternatively if you have a good covering of colour paint you can spray a coat of clear lacquer over the casting for an excellent finish, but do not use any form of polish prior to the lacquer or it may react. Remember to paint wheels and any other items that are required in body colour at the same time. Remember also not to mix types of paint on the body casting, if you have used a Humbrol enamel, you cannot spray an acrylic lacquer on top as it will react. For two toning masking tape will be required, this can be carefully fitted to the edge you have or you can leave a little overlap and then trim with a fresh blade in your scalpel, this can give a better result on curved areas. Remember also that if one of the colours used is a red, you will have to apply this colour last, as it will bleed through the second colour.
A few final small tips are that paint will adhere to a warm casting better than a cold one, but a casting too warm will blow bubbles in the paint if the casting you have has any porosity and most have a little. Always allow your sweep across the model to be even, start before you reach the body and end just after. Finer coats of paint built up slowly will reduce the risk of runs; these are created by putting too much paint on too quickly. If you have made a serious mistake and it is necessary to strip the model, the simplest way is to half fill a jam jar with cellulose thinners and soak the model in this for a short while. Clean with an old toothbrush to remove sediment from door lines etc.
Interior parts can be painted with Humbrol or Tamiya paints from the model shop, or if the interior parts are satin black they can be sprayed using a satin black spray can which will be useful for the dashboard and base plate also. Remember to detail the interior to the level of your choice as the more effort put into your model at this stage, the better the finished result will be. Humbrol have satin paints as well as matt for seating and carpets etc, Tamiya have good matt paints and if a soft polishing cloth is rubbed over the finished item when dry a good result can be obtained. Any wood door capings or wooden dash fascia items should also be painted now with a gloss light brown. The plated grille can be black washed with a thinned black paint, allow it to run into the grooves and then wipe clear remaining paint from surface of grille bars.
Now is a good time to leave everything somewhere warm for a day to ensure it all dries properly prior to assembly. If the paint/lacquer appears soft, leave it on a radiator or somewhere warm to assist the paint to bake, do not allow the casting to get hot or it may distort.
We can now look at assembling the model, the route you take is up to the individual, we will build up the interior first. Fitting door handle & window winders, handbrake, gear lever, pedals etc prior to fitting the seats. If the door side panels are separate, build these up with the door handles and winders if required and detail to the level that suits you. Build up the dash and detail prior to fitting steering column and wheel, then fit to interior.
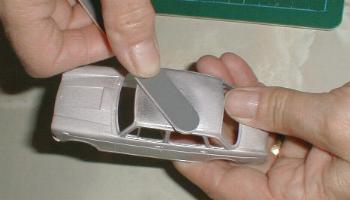
If you are going to bright scrape the body make sure you have a sharp blade in your scalpel, cover the blade with masking tape leaving only the very point clear about 1/8th of an inch. Carefully allow the tip of the blade to run along the top edge of the part being scraped, the blade should run between the paint and the metal, this is an art and will take some practice. Better to take too little as too much, do it gradually and you will get better at it as you go along. When the metal is showing run the tip of the blade at right angles to the bright metal and move across it evenly, this will straighten any irregularities and give a brighter edge. To improve the edge run something smooth and metal across the surface but be careful not to allow it to slip and damage the paint, a final polish will highlight the effect.
Trim the vac form window area and fit into place, it should remain in position but if required a little glue in the roof will secure it, alternatively double sided tape can also be used for this job. Glue the interior mirror into position in the rooftop. Fit grille and larger plated items to the body and leave to dry. Check the axle lengths against the base plate to ensure they are correct and carefully using a small drop of super glue attach the wheels to the axles.
SLIPPING WAXED PAPER BETWEEN THE BODY AND THE INTERIOR TUB HOLDS THE VAC FORM IN CORRECT POSITION AND AVOIDS DAMAGE TO THE WINDOW AREA.
You should now be able to tip the body upside down, insert the interior, place wheels and axles with tyres fitted into place and possibly a bumper or both will have to be placed in position. Place the base plate on top of the unit making sure the axles have located correctly and screw the base plate and body together. You should now be able to have your model on its wheels.
To shape the photo etch windscreen wipers you will require a pair of small pliers to hold the photo etch arm whilst you form the correct shape for the blade and bend over a very small amount of the arm at its base to place in the hole drilled in the body. The shaping of the wiper depends upon the fall of the wipers on the model you are building, they may fall to either the left or right hand side of the windscreen. Once formed they can be glued into position with a small amount of solvent free glue on the tip you bent to go into the body.
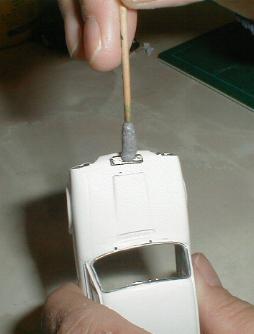
USING THE COCKTAIL STICK WITH BLUETACK END TO FIT SMALL HARD TO HOLD PARTS WITHOUT GETTING GLUE EVERYWHERE.
We work front to rear, in other words we put the model with the front raised on something and fit the remaining front end plated parts and leave to dry. When dry we then work on the rear of the model and repeat as before, then working from side to side fit door handles etc. It can be advisable to leave the model resting on its side whilst the glue dries on the door handles, this stops the front of the door handle slipping and pointing down. Turn the model over and fit any exhaust system parts. When dry return the model to its wheels, it may be advisable to leave it for a day now to permit the glue to fully dry prior to moving it around to fit transfers etc.
Prior to fitting transfers check the body area where the transfers are going, make sure there are no glue deposits across where you want to be working, if there is it should clean off with a damp soft cloth. Place a little warm water in a shallow dish, we use a thin section of foam sponge in the water to ensure the transfer doesn’t sink. Allow the transfer to soak and when released slide it onto the area where you require it, it can be easily moved if required for repositioning with a fine paintbrush and water. Some people use the bottles of Humbrol transfer fix etc, some don’t, that choice is yours. When dry a thin coat of clear varnish will protect the transfer. If you are working with an Abbey Classics kit the number plates will be computer created, these have a film that needs to be peeled off from the back and the number plate can then be correctly positioned and then fitted. Again leave the model for a few hours before polishing or you run the risk of damaging the transfers.
Your model is now ready for that final polish; household furniture spray is excellent for this used with a soft cloth. Your model is now ready to go into your display cabinet.
If you feel we have got something wrong here, or there is something we have missed out, tips of your own which you find useful, please let us know and we will add it to this guide.
HAPPY BUILDING FROM THE CROSSWAY TEAM
|
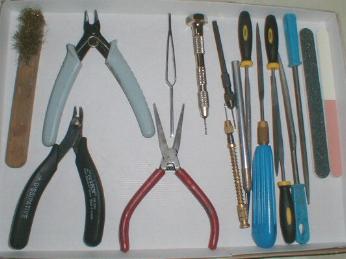 A
small half round file for casting cleaning plus a half round needle file for
fine cleaning around the window apertures etc, both these files as already
mentioned are preferably to be of half round type as these give manoeuvrability
into most apertures on the model. Small drills, preferably in a pin vice (small
hand held drill) for ease of handling, we use mainly 1mm drill bits for most
small holes in the body though larger will be required for some things. With
Abbey Classic kits most holes in the body should be pre drilled for you. A pair
of flat edge cutters and a small fine nosed pair of pliers will be useful for
shaping photo etch wipers etc if included. A small brass wire brush for cleaning
castings prior to painting. A small craft knife will also be of
assistance for removal of flash, it will also be a necessity if you are
intending to bright scrape the model after painting, more about that later on.
Fine grade emery paper will be required, but keep it very fine when rubbing down
ready for final painting. A pair of tweezers will be of assistance in holding
small parts, also of assistance here will be a cocktail stick with a small
amount of blue tack on the end for holding those tiny round items that will fly
out of the tweezers. Glues required will be super glue for attaching wheels to
axles, don’t be tempted to use it anywhere else. A PVA or Bostic Non Solvent
is good for fitting of smaller plated parts like door handles and wipers. For
seats etc a clear two-pack resin can be used or a strong solvent free like Weld
Bond, which we can supply if, required. We do not recommend the use of
solvent-based glues, as these will melt the paint where they touch it.
A
small half round file for casting cleaning plus a half round needle file for
fine cleaning around the window apertures etc, both these files as already
mentioned are preferably to be of half round type as these give manoeuvrability
into most apertures on the model. Small drills, preferably in a pin vice (small
hand held drill) for ease of handling, we use mainly 1mm drill bits for most
small holes in the body though larger will be required for some things. With
Abbey Classic kits most holes in the body should be pre drilled for you. A pair
of flat edge cutters and a small fine nosed pair of pliers will be useful for
shaping photo etch wipers etc if included. A small brass wire brush for cleaning
castings prior to painting. A small craft knife will also be of
assistance for removal of flash, it will also be a necessity if you are
intending to bright scrape the model after painting, more about that later on.
Fine grade emery paper will be required, but keep it very fine when rubbing down
ready for final painting. A pair of tweezers will be of assistance in holding
small parts, also of assistance here will be a cocktail stick with a small
amount of blue tack on the end for holding those tiny round items that will fly
out of the tweezers. Glues required will be super glue for attaching wheels to
axles, don’t be tempted to use it anywhere else. A PVA or Bostic Non Solvent
is good for fitting of smaller plated parts like door handles and wipers. For
seats etc a clear two-pack resin can be used or a strong solvent free like Weld
Bond, which we can supply if, required. We do not recommend the use of
solvent-based glues, as these will melt the paint where they touch it.